Week 10 Mapbox Basemap
If you're stuck - this is how your webmap for this week will be structured! https://github.com/cwilmott/c183-webmap
Foundations 
Let's take it slllooooowww. Breathe!
Mapbox
First, we need to create our very own Mapbox map. Mapbox is a semi-open source tool we can use to make web maps. Its data is based on OpenStreetMap, and we get a lot of free views so it's a useful tool to begin your first web map.
1. Set up Mapbox
So, let's head over to
Enter the credentials you wish to use, and set up your account.
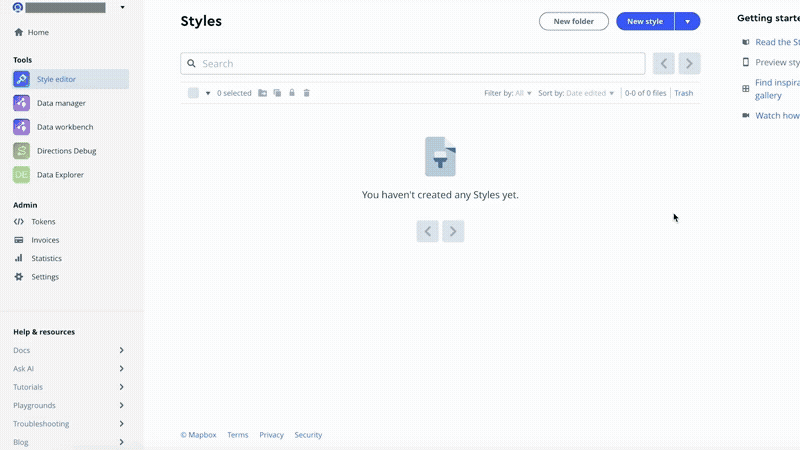
2. Create a Mapbox Style
Now that you're successfully in Mapbox, let's create a custom map style!
- Open the Mapbox Studio styles page, where all your map styles will be listed.
- Click the drop down next to the New Style button.
- Select Classic template.
- Select the Default style.
- Choose a base variation.These colors can be adjusted later.
- Click Customize Defaulte.
Once you're in, have a play around with different styles and have some fun - change some fonts, and see if you can establish a different color scheme based on our lectures last week.
If you'd like to learn more (or be more intentional), check out https://docs.mapbox.com/studio-manual/reference/styles/
3. Publish your Style
Once you're done with your style, we need to make sure it's publically visible before we put it in our web map!
The Publish button in the upper right of the style editor allows you to save your style so you can use it. When you click Publish the following information appears:
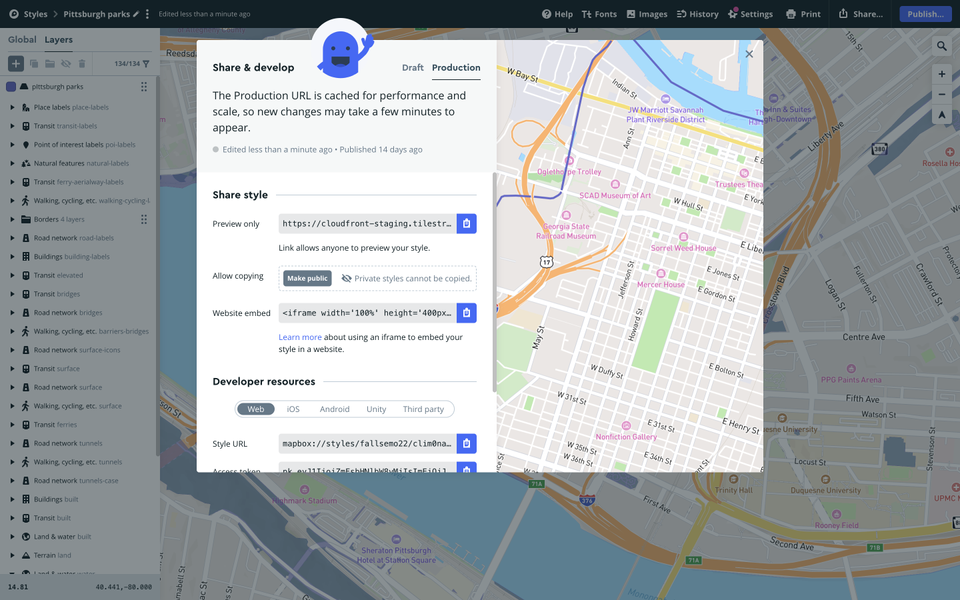
Make sure you make your style public!
We're going to publish to web, so at the bottom you'll need to save these two pieces of code somewhere safe (but don't worry, you can always get them back!):
- Style URL - this is the unique identifier of your map
- Mapbox Token - this is a secret code which links to your Mapbox Account.
Create Your Web Map
So now we are going to create a very basic framework to host your webmap using Github. We will use Code Pen while we get used to coding in html/css/js - and then export the as a .zip file, and upload it to Github.
1. Set up Code Pen
The first thing you need to do is set up a Code Pen account - if you haven't already.
Go to https://codepen.io/ and choose "Sign Up". You may sign up with either your email or your github account.
On the top right, under the "Create" submenu, select Pen, then, Pen.
Your page should look like this:
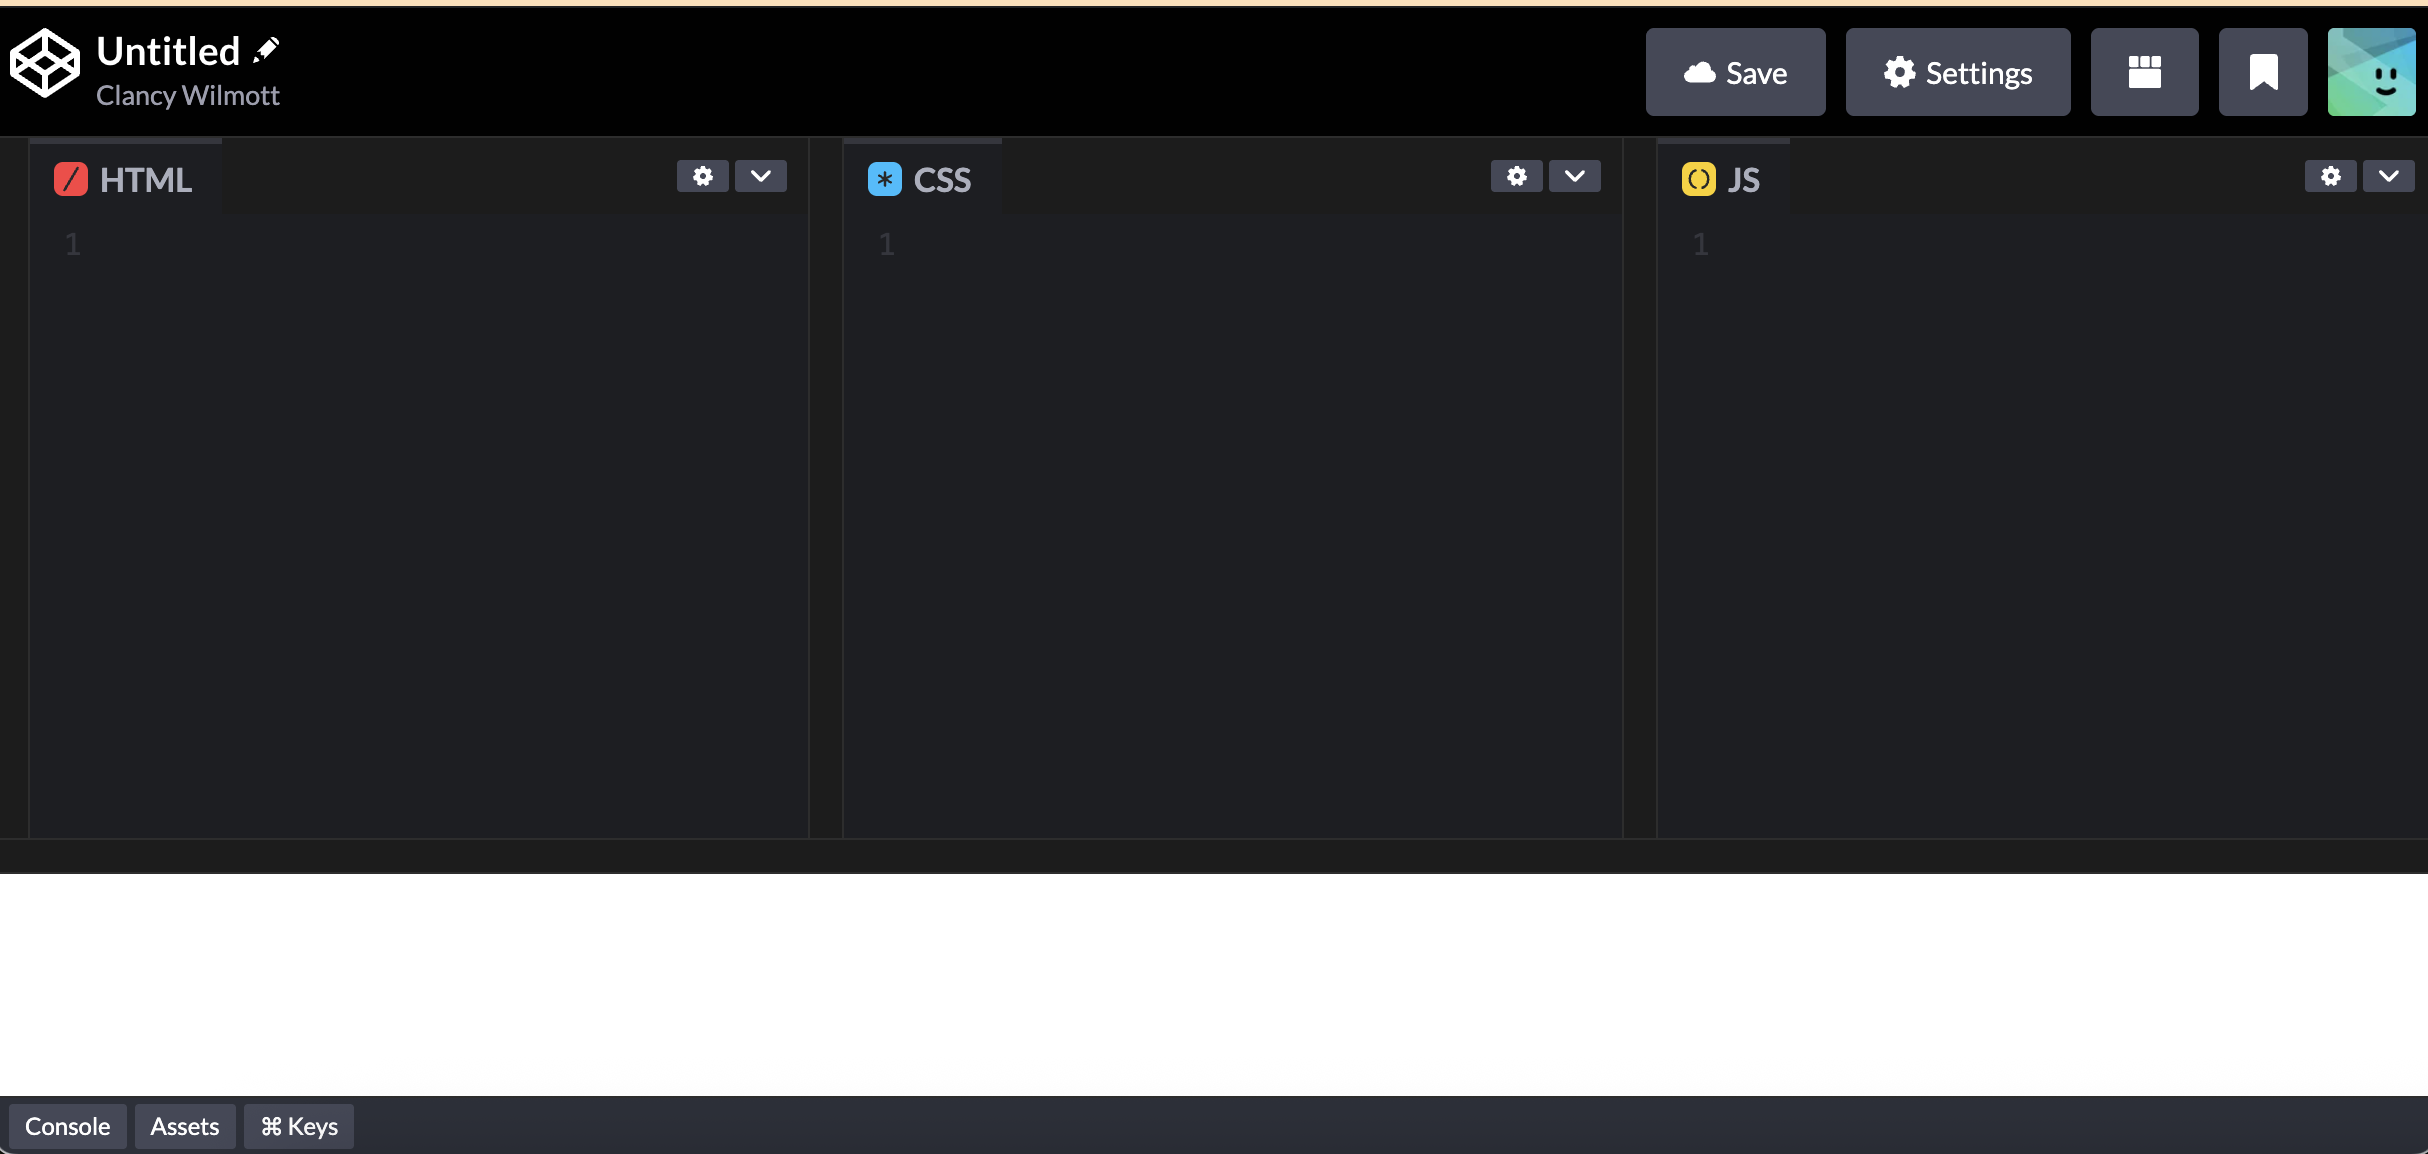
As you may remember from lecture, code pen has three windows - one for HTML, one for CSS and one for .js. We will be putting different pieces of code into different windows! And remember, nothing is broken for ever! When in doubt, Ctrl + Z
Now, let's start coding!
2. Set up your HTML
First, we need to create a HTML container for your web map to be held in. We're going to use the <div> tag to create a division to hold your map.
In the HTML box, either type or copy and paste the below code:
This code bascially means "this is a division, with the id of "map". Nothing will change, because it's just an invisible structure! We haven't put anything into it yet!
Now, we need one extra piece of code so the HTML knows where to access the Mapbox GL JS library. Following your <div></div> tag, let's create a <script> tag, which is a little bit of javascript, showing the HTML where to go:
3. Set Up Your CSS
Next, we need to style your map <div> using CSS. You can choose how big or small you want your map to be in future, but to make it easier for now, we are going to make the map full page, with no margins and to be 100% the width of the web browser.
Your css component, thus has two components: a style for the <body> (body) and a style for the <div id=map> (#map)
Again, you'll see nothing because we haven't put anything in your <div id=map> section.
4. Set up Your .js
Now we can set up your map using Javascript! To do this, we need to set up two elements:
1. Your mapbox access token so the web page knows which account to access.
2. The const map where we set up the map's interactive elements (zoom, pan). (Next week, we will add variables and events!)
This is the code that we need to add:
Now, here is an experiment for you. See if you can see where you put your Mapbox Access Token and try to remember where you might access it, (1) and if you are stuck, check out the arrow.
- your mapbox access token can be found when you click Share on your mapbox map.
5. Bring in your own custom Mapbox Map
So, this is a fine map, but it's not yours. Let's add a little bit of code to bring in your own map. We are going to add a parameter called style which allows us to set which kind of map we'd like.
Copy and paste the code below into your map (make sure you include the comma at the very end!)
Yes, yes - it's broken, but that's because we haven't made it work yet! Don't worry as long as your js looks something like this:
Now, return to Mapbox and click share! Above your Access Token, you'll see a Style URL - replace the text in style: 'mapbox://styles/your-mapbox-username/your-custom-style-url' with your own style url, making sure to keep the apostrophes/syntax on each side.
Now your code should look something like this, and you should be able to see your map:
If it hasn't worked - check your code carefully - the grammar/syntax (, ; ' :) is very important, and easy to get lost in copy/paste. In the worst case, just paste the above code, and change the Access Token and Style URL.
Transfer to Github
If you've managed to get your map up and running, congrats! Now, let's get it out of Code Pen and into Github so we can host it on our own website.
1. Export
At the bottom-right of your Code Pen is a button Export. 1. Click Export 2. Select Export .zip
This will export a zip file to your downloads folder. You need to go to the dist file, which has three files: - index.html - style.css - script.js
2. Upload Files
Now, we need to add these files to your Github. 1. Login to Github 2. Go to your repository which you made last week. 3. Then select Add File and Upload Files 4. Drag these three files into the window 5. Select Commit Changes
3. Check its worked!
Now, we're going to see if our website has worked - it might take over 10 minutes for your files to commit (Github is a little slow!) so don't panic right away! 1. Go back to Settings 2. Select Pages from the menu on the left. 3. At the top of the page, there will be a section where you can see the link to your website. Click on it and see if your map loads!
(and if not, no worries! submit the link to repository for the lab, and trouble shoot in office hours :-) )
Experimental 
Okay, fast rabbits! A few things to keep in mind: 1. The commas, apostrophes - what is called syntax - is important. If your code doesn't work, chances are it's a syntax problem. 2. We are setting up our website the traditional way, using files + folders (not codepen) so you get used to the structure of a website. Strong recommend to install Visual Studio Code on your laptop.
Mapbox
First, we're gonna make a custom map by creating our own stylesheet. Mapbox does most of the work for us.
1. Set up Mapbox
So, let's head over to https://www.mapbox.com/ . In the top-right corner select Sign Up.
Enter the credentials you wish to use, and set up your account.
2. Create a Mapbox Style
Now that you're successfully in Mapbox, let's create a custom map style!
Open the Mapbox Studio styles page, where all your map styles will be listed. 1. Click the drop down next to the New Style button. 2. Select Classic template. 3. Select the Monochrome style. 4. Choose a base variation.These colors can be adjusted later. 5. Click Customize Monochrome.

Once you're in, have a play around - but i'd try to see if you can figure out how to add a new font, play with symbols, add new layers. Check out https://docs.mapbox.com/studio-manual/reference/styles/
3. Publish your Style
Once you're done with your style, we need to make sure it's publically visible before we put it in our web map!
The Publish button in the upper right of the style editor allows you to save your style so you can use it. When you click Publish the following information appears:
We're going to publish to web, so at the bottom you'll need to save these two pieces of code somewhere safe (but don't worry, you can always get them back!):
- Style URL - this is the unique identifier of your map
- Mapbox Token - this is a secret code which links to your Mapbox Account.
Create Your Web Map
We're going to use Visual Studio Code to set up your web map. If you're familiar with Git or Github, you can push directly to your respository. If not, let's stick with copy + paste for now.
1. Set up your folder
On your desktop, or somewhere you can find, create a new folder called "183webmap"
2. Set up Visual Studio Code
On your desktop, open Visual Studio Code. NB: It is different to Visual Studio - the logo looks like this:
- Select Open
- Choose your 183webmap folder
- Select Open or similar.
3. Create + Code your HTML file
Now, we need to create files in this folder which we can use to build our web map. 1. Select New File 2. Call it index.html 3. Then select Create.
Once we have the file, let's code in the basic structure of our html file.
You'll recall HTML files have a basic structure. Copy and paste this into your `index.html file.
<head> section we need to add two tags, which tells the browser which language to expect, and what the title of your web page is:
<body> section, which bascially creates a division with the id of "map", so our js can find it later.
index.html FILE.
4. Create your CSS file + Link to your HTML
Let's quickly now create a CSS stylesheet for your map, so we can style it easily. 1. Go to File > New File 2. Call it style.css
Now, let's style some elements. We want our map to be full size, so we need to add two components:
1. a body style element, which styles the overall <body> section
2. a #map style element, which styles elements which have the id=map tag.
Here is the code:
position: absolute;) do.
Finally - we need to link your style.css sheet to your index.html file, as well as the stylesheet from Mapbox to help out with the map styling.
In the <head> section, copy and paste the two links below.
Your code should look something like this:
5. Create and set up your .js file
Finally, we are ready to create our Javascript file, which is when we will finally be able to test our map and make sure it works. As above, create a new file and name it script.js.
Before we put any scripting into it, let's make sure our HTML file knows where to look to find it the different scripts it will need. Again, we need to add two Javascript files:
1. One relative link to our own script.js file;
2. One absolute link to the Mapbox GL JS script file.
This will go in the <body> section of the index.html file.
Here is the code which will link to the script:
6. Write your map object
First, we need to write our map object in our script.js file - we are going to use a library called Mapbox GL JS which makes it easy, and has lots of useful tools like built-in popups, and location trackers.
All Mapbox maps require access to your mapbox account. It gets access through an access token, with the code
script.js file and replace the \\your access token goes here component with your access token from Mapbox (see if you can remember where you find it. Don't forget to make sure the apostrophes (' ') remain on either side of the access token.
Your script.js file should now look something like this:
const function for the map, which will use mapboxgl to bring in a javascript map and allow us to define some parameters.
The const map function is structured like this:
script.js document under your accessToken, and see if you can figure out how to change the zoom: or the center: parameters so that it starts in Berkeley on z9.
Since we're not running this live like we would be in CodePen, we actually need to run the code to check that it's worked - this is called debugging. There are two ways of doing this:
-
Save your files, and then in Visual Studio Code return to your
index.htmlpage, and select from the icons on the left, "Run and Debug". It will look like this: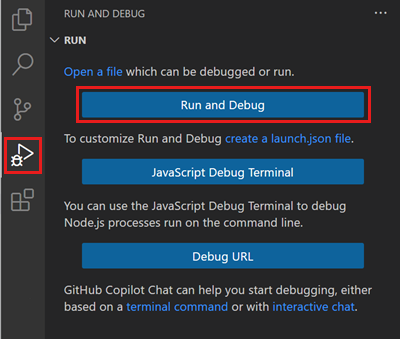
-
Or, alternatively, save your files and then drag your index.html file into a web browser of your choice.
If it has worked, you should see a map in your web browser! If it hasn't, try to debug it!
7. Add a custom map style
Once your map is working, we can finally add the Mapbox Style we were working on! To do this, it's fairly simple - you just add another parameter to your const map constant called style
The code looks like this
const map function, copy and paste the parameter afer container, and then add your own Style ID from Mapbox.
Your script.js file should look something like this:
Save and then Debug. If it works, we are good to go to the next phase!
Transfer to Github
Now, we need to add these files to your Github. 1. Save your files, and close Visual Studio Code. 2. Login to Github 3. Go to your repository which you made last week.
1. Upload Files
In the repository, select Add File and Upload Files 1. Drag these three files into the window 2. Select Commit Changes
2. Check its worked!
Now, we're going to see if our website has worked - it might take over 10 minutes for your files to commit (Github is a little slow!) so don't panic right away!
1. Go back to Settings
2. Select Pages from the menu on the left.
3. At the top of the page, there will be a section where you can see the link to your website. Click on it and see if your map loads!
(and if not, no worries! submit the link to repository for the lab, and trouble shoot in office hours :-) )